
Building a Complete CI/CD Pipeline for Expo Apps with EAS Updates and Push Notifications
Building a Complete CI/CD Pipeline for Expo Apps with EAS Updates and Push Notifications
Note: While building RepoGo, an AI code editor for iOS, I wanted my CI/CD to be effortless. Frankly, App Store submissions feel like an exam moment—I just want to push to
mainto ship an update. That's what this guide walks you through.
See It In Action
Here's a complete walkthrough of the entire update process from push to user notification:
The Problem: Manual Updates Are a Developer's Nightmare
Picture this: You've just fixed a critical bug in your Expo app. Now you need to:
- Build a new version
- Submit it to the App Store
- Wait days for review
- Hope users actually update their app
For minor updates and bug fixes, this process is painfully slow. Your users are stuck with bugs while you wait for App Store approval. There had to be a better way.
That's when I discovered the power of EAS Updates combined with GitHub Actions and push notifications. The result? A fully automated CI/CD pipeline that:
- ✅ Automatically publishes updates when code is pushed to
main - ✅ Sends push notifications to all users about the update
- ✅ Shows an in-app modal prompting users to update
- ✅ Installs updates seamlessly without App Store approval
Let me show you exactly how I built this system.
Prerequisites
Before we dive into the implementation, make sure you have:
Required Accounts & Setup
- Expo Account - Sign up at expo.dev
- EAS CLI Installed - Run
npm install -g eas-cli - Expo Project Configured - Your app must be set up with EAS
- GitHub Account - With a repository for your Expo app
- Backend Server - To handle push notification broadcasts (Next.js, Express, etc.)
- Push Notifications Configured - Use Expo's push notification service to send notifications to users
Configure EAS Updates
If you haven't already, initialize EAS in your project:
cd native/
eas login
eas update:configure
eas build:configure
This creates an eas.json file with your build and update configurations.
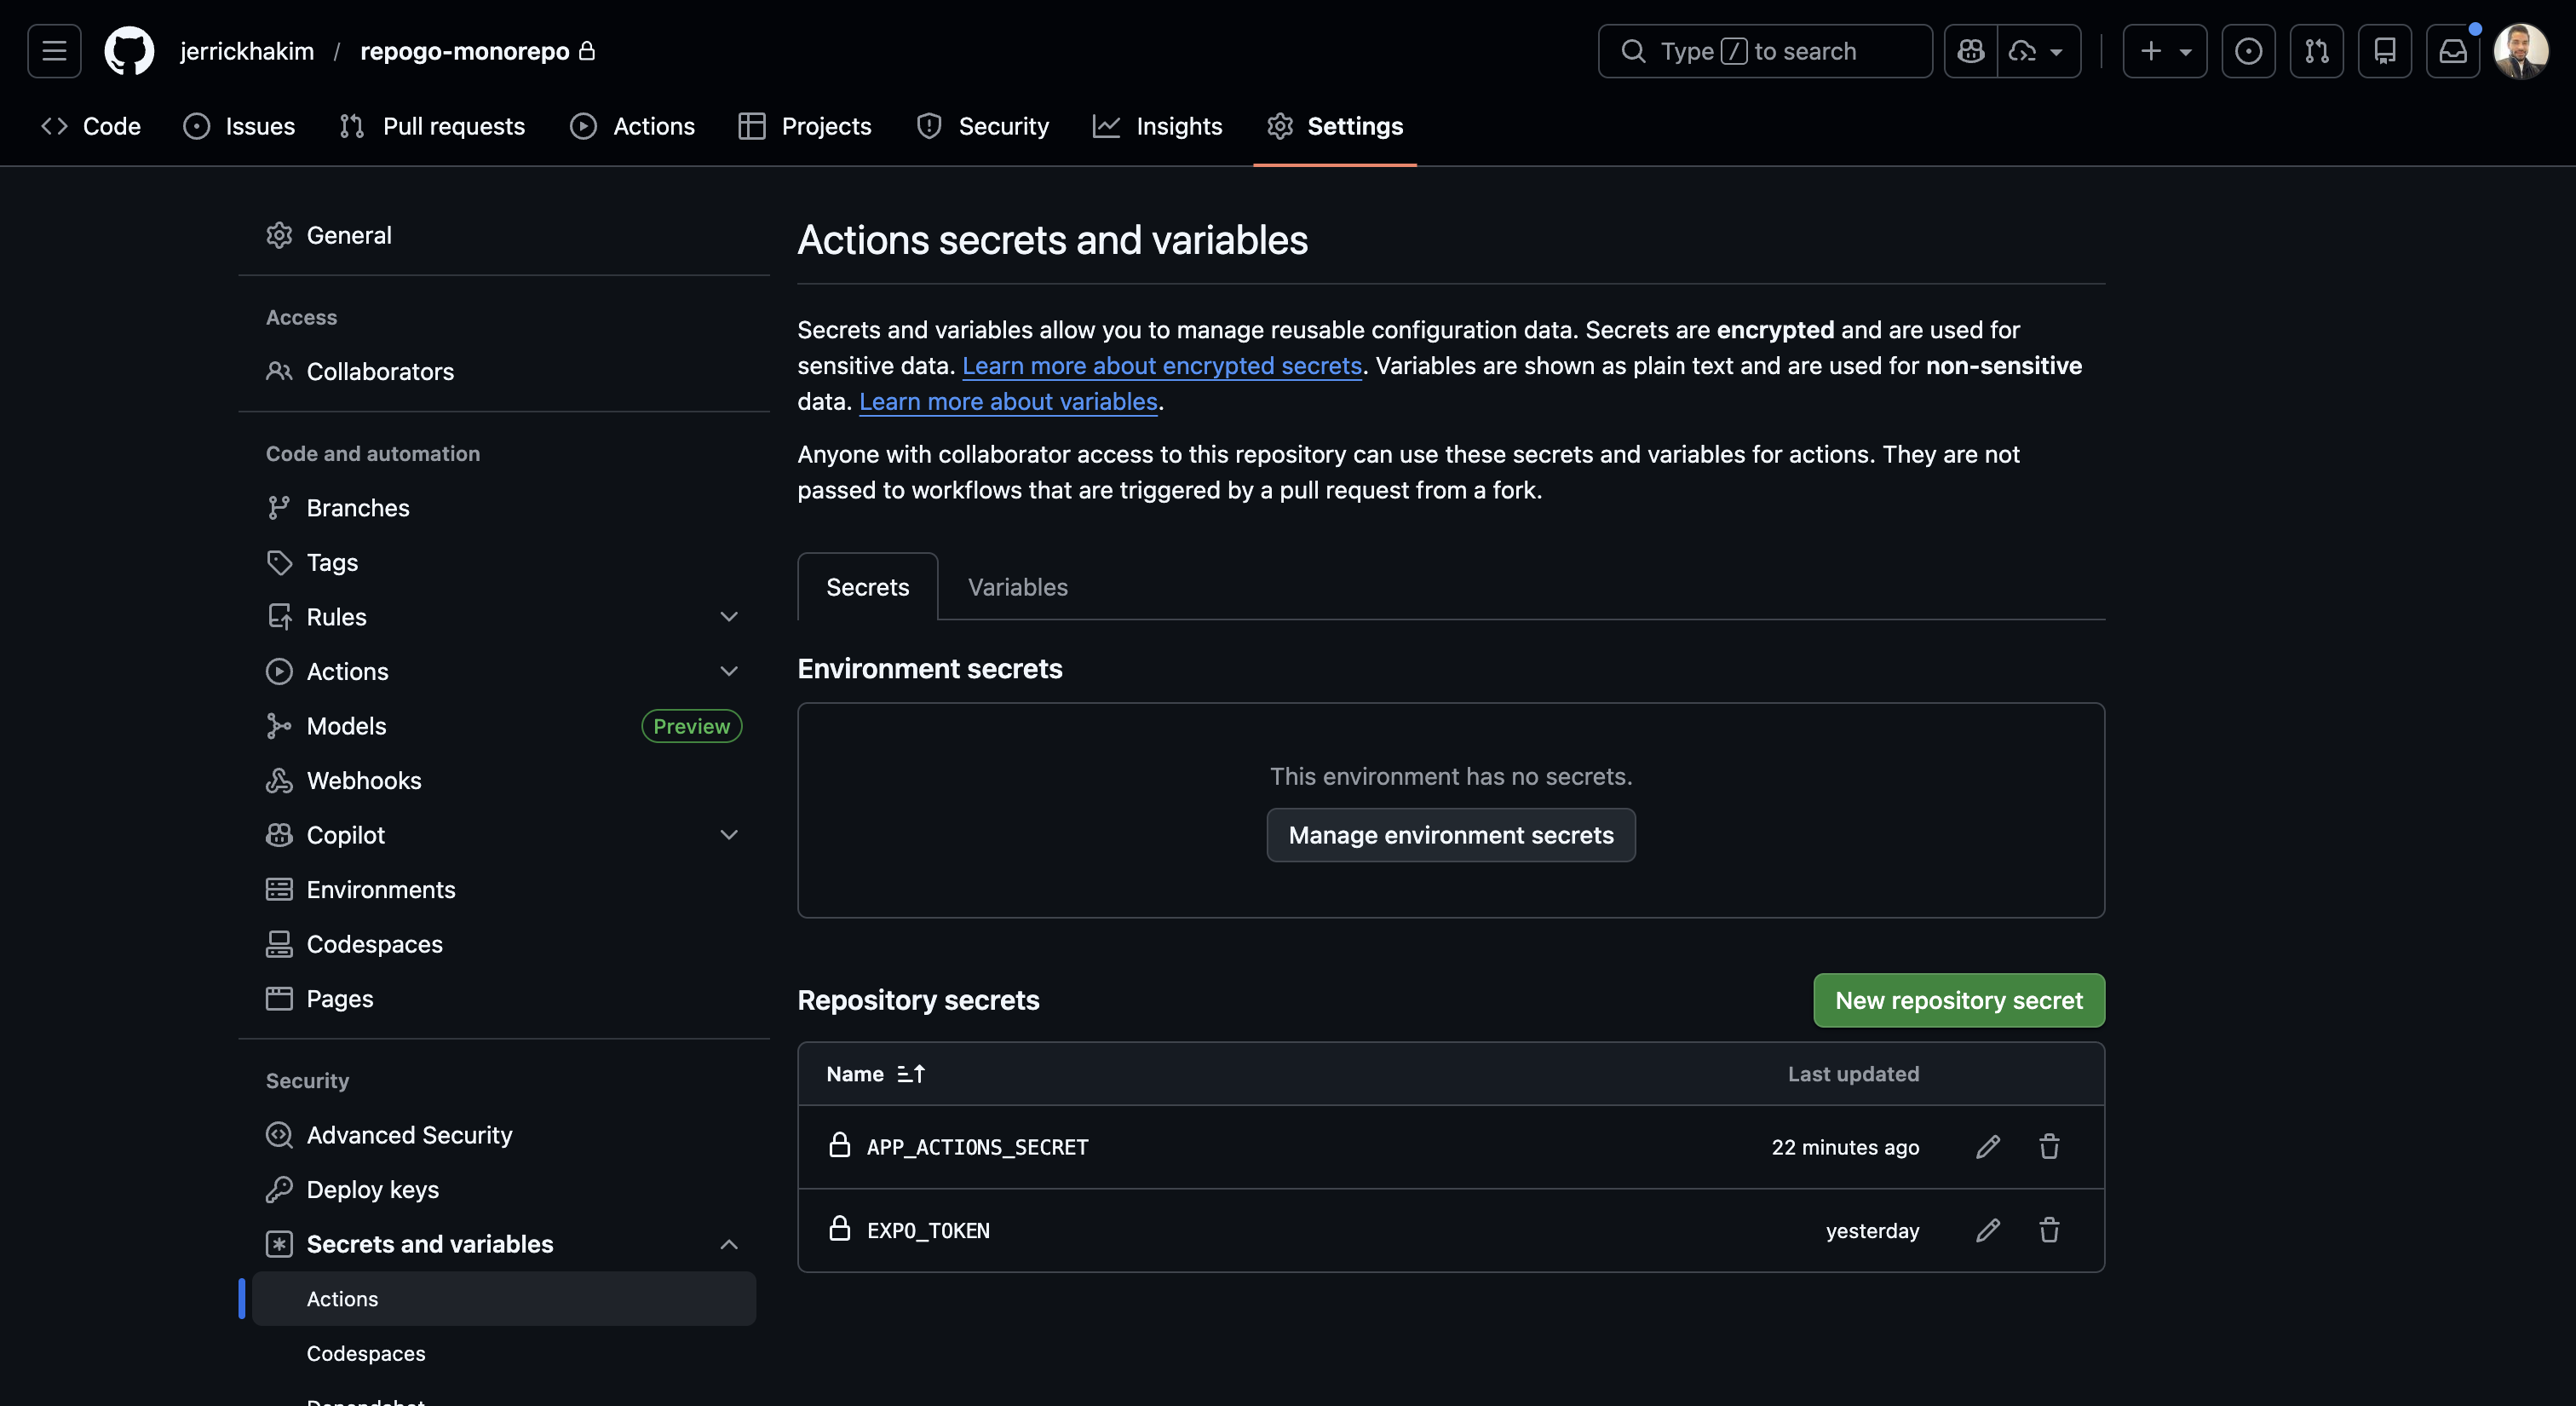
Configure GitHub Secrets
In your GitHub repository, go to Settings → Secrets and variables → Actions and add:
- EXPO_TOKEN - The token you got from
eas whoami --json - APP_ACTIONS_SECRET - A random secret string (use a password generator)
The APP_ACTIONS_SECRET is used to secure the API endpoint that sends push notifications.
Configure Your Backend
Add the same secret to your backend environment variables:
APP_ACTIONS_SECRET=your-random-secret-here
This allows your API to verify that requests are coming from your GitHub Actions.
Configure Push Notifications
Your app needs to have Expo push notifications set up to send update notifications to users. This includes:
- Installing
expo-notificationspackage - Requesting notification permissions from users
- Storing push tokens in your database
- Implementing
sendPushNotificationToAllUsers()function in your backend usingexpo-server-sdk
This guide assumes you already have push notifications configured. If not, refer to the Expo Push Notifications documentation for setup instructions.
Now let's build the system!
The Architecture: Five Key Components
The system has five main parts working together:
- EAS Update Workflow - Triggers on push to
mainand publishes the update - Notification Workflow - Separate workflow that sends push notifications to users
- API Route - Receives request from GitHub Action and broadcasts push notifications
- AppUpdateProvider - React Context that manages update checking and installation
- Linking Hook - Handles notification taps and triggers update checks
Let's break down each component.
Part 1: The EAS Update Workflow
The foundation is a GitHub Action that runs whenever code is pushed to the main branch. It publishes an EAS update and then triggers a second workflow to notify users.
Create .github/workflows/eas-update.yml:
[!NOTE] This workflow is for a monorepo with a
native/directory. If you're not using a monorepo, you can remove thepathsfilter.
name: EAS Update

on:
  push:
    branches: [main]
    paths:
      - "native/**"
      - ".github/workflows/eas-update.yml"

jobs:
  update:
    runs-on: ubuntu-latest
    permissions:
      contents: read # Required for actions/checkout
    steps:
      - name: Check for EXPO_TOKEN
        run: |
          if [ -z "${{ secrets.EXPO_TOKEN }}" ]; then
            echo "Error: EXPO_TOKEN secret is missing."
            exit 1
          fi

      - uses: actions/checkout@v4

      - name: Setup Bun
        uses: oven-sh/setup-bun@v2
        with:
          bun-version: latest

      - name: Install dependencies
        working-directory: native
        run: bun install --frozen-lockfile

      - name: Setup EAS
        uses: expo/expo-github-action@v8
        with:
          eas-version: latest
          token: ${{ secrets.EXPO_TOKEN }}

      - name: Publish update
        working-directory: native
        env:
          EAS_SKIP_AUTO_FINGERPRINT: "1"
          EXPO_USE_METRO_WORKSPACE_ROOT: "0"
          NODE_OPTIONS: "--max-old-space-size=4096"
          # Required for Metro to inline these values at bundle time
          EXPO_PUBLIC_PROJECT_ID: "your-project-id"
          EXPO_PUBLIC_EDITOR_URL: "https://editor.your-app.com"
          EXPO_PUBLIC_API: "https://your-api.com"
          EXPO_PUBLIC_GITHUB_CLIENT_ID: "your-github-client-id"
        run: bunx eas update --branch production --platform ios --message "Auto-update from GitHub Action" --non-interactive

      - name: Trigger notification workflow
        if: success()
        uses: actions/github-script@v7
        with:
          script: |
            github.rest.actions.createWorkflowDispatch({
              owner: context.repo.owner,
              repo: context.repo.repo,
              workflow_id: 'notify-app-update.yml',
              ref: 'main',
              inputs: {
                message: 'A new version is available! Restart the app to get the latest updates.',
                platform: 'ios',
                branch: 'production'
              }
            })
Key Features:
- Security check: Validates
EXPO_TOKENexists before proceeding - Environment variables: Injects all necessary Expo config at build time
- Workflow dispatch: Triggers the notification workflow only after successful update
Why Two Workflows?
Separating the update and notification steps provides several benefits:
- Better error isolation - If notifications fail, the update still succeeded
- Reusability - You can manually trigger notifications without deploying
- Cleaner logs - Each workflow has a focused responsibility
- Flexibility - You can customize notification behavior independently
Part 2: The Notification Workflow
This workflow is triggered by the EAS Update workflow (or manually) and handles sending push notifications to all users.
Create .github/workflows/notify-app-update.yml:
name: Notify App Update

on:
  workflow_dispatch:
    inputs:
      message:
        description: "Notification message to send to users"
        required: true
        type: string
        default: "A new version is available! Restart the app to get the latest updates."
      platform:
        description: "Platform (ios, android, or all)"
        required: true
        type: string
        default: "ios"
      branch:
        description: "Update branch"
        required: true
        type: string
        default: "production"

jobs:
  notify:
    runs-on: ubuntu-latest
    steps:
      - name: Send notification to users
        env:
          API_URL: "https://your-api.com/api/notify-app-update"
          APP_ACTIONS_SECRET: ${{ secrets.APP_ACTIONS_SECRET }}
        run: |
          echo "Sending app update notifications to all users..."
          echo "Message: ${{ inputs.message }}"
          echo "Platform: ${{ inputs.platform }}"
          echo "Branch: ${{ inputs.branch }}"

          RESPONSE=$(curl -X POST "$API_URL" \
            -H "Content-Type: application/json" \
            -H "x-github-actions-secret: $APP_ACTIONS_SECRET" \
            -d '{
              "message": "${{ inputs.message }}",
              "platform": "${{ inputs.platform }}",
              "branch": "${{ inputs.branch }}"
            }' \
            -w "\nHTTP_STATUS:%{http_code}" \
            -s)

          HTTP_STATUS=$(echo "$RESPONSE" | grep "HTTP_STATUS" | cut -d':' -f2)
          BODY=$(echo "$RESPONSE" | sed '/HTTP_STATUS/d')

          echo "Response: $BODY"

          if [ "$HTTP_STATUS" = "200" ]; then
            echo "✅ Successfully sent app update notifications"
          else
            echo "❌ Failed to send notifications (HTTP $HTTP_STATUS)"
            echo "Response body: $BODY"
            exit 1
          fi
Key Features:
- Workflow dispatch: Can be triggered automatically or manually
- Input parameters: Customizable message, platform, and branch
- Error handling: Fails with detailed error messages if notification fails
- Manual testing: You can trigger this from GitHub UI or Postman to test notifications
Manual Trigger
You can manually trigger this workflow from GitHub:
- Go to Actions tab in your repository
- Click Notify App Update workflow
- Click Run workflow
- Fill in custom message, platform, and branch
- Click Run workflow
This is perfect for testing or sending custom notifications to users.
GitHub Actions in Action
Here's what your GitHub Actions workflows look like in the GitHub UI:
And here's the notification workflow being triggered automatically:

Part 3: The API Route for Push Notifications
When the notification workflow runs, it calls this Next.js API route to send push notifications to all users.
import { NextRequest, NextResponse } from "next/server";
import { sendPushNotificationToAllUsers } from "@/server/notifications";

export async function POST(request: NextRequest) {
  try {
    // Verify the request is coming from GitHub Actions
    const authHeader = request.headers.get("x-github-actions-secret");
    const expectedSecret = process.env.APP_ACTIONS_SECRET;

    if (!expectedSecret) {
      console.error("[App Update] APP_ACTIONS_SECRET not configured");
      return NextResponse.json({ error: "Server configuration error" }, { status: 500 });
    }

    if (authHeader !== expectedSecret) {
      console.error("[App Update] Unauthorized request");
      return NextResponse.json({ error: "Unauthorized" }, { status: 401 });
    }

    // Parse request body
    const body = await request.json().catch(() => ({}));
    const { message, platform, branch } = body;

    // Construct notification payload
    const notificationPayload = {
      title: "App Update Available! 🚀",
      body: message || "A new version of the app is ready. Update to get the latest features.",
      sound: "default" as const,
      data: {
        url: "repogo://",
        actionType: "update",
        platform: platform || "ios",
        branch: branch || "production",
        timestamp: new Date().toISOString(),
      },
    };

    // Send the broadcast notification
    const result = await sendPushNotificationToAllUsers(notificationPayload);

    return NextResponse.json({
      ...result,
      message: "App update notifications sent successfully",
    });
  } catch (error) {
    console.error("[App Update] Error:", error);
    return NextResponse.json(
      {
        error: "Failed to send notifications",
        details: error instanceof Error ? error.message : "Unknown error",
      },
      { status: 500 }
    );
  }
}
Security Considerations:
- Secret verification: The endpoint checks for a matching secret to prevent unauthorized access
- Graceful degradation: If the secret isn't configured, it returns a 500 error
- Structured logging: All actions are logged with clear prefixes for debugging
Part 4: The AppUpdateProvider Component
This is the heart of the update system. It's a React Context provider that:
- Checks for updates periodically (every 5 minutes)
- Shows a beautiful modal when an update is available
- Handles both Expo updates and App Store updates
- Manages the entire update lifecycle
import useAlert from "@/hooks/useAlert";
import Constants from "expo-constants";
import * as Updates from "expo-updates";
import { BottomSheet, Button } from "heroui-native";
import { createContext, useContext, useEffect, useState } from "react";

const UPDATE_CHECK_INTERVAL = 5 * 60 * 1000; // 5 minutes

interface AppUpdateContextType {
  checkForUpdates: (alertFeedback?: boolean) => Promise<void>;
  isChecking: boolean;
  isUpdating: boolean;
  isModalOpen: boolean;
  updateMethod: "appStore" | "expo" | null;
  handleExpoUpgrade: () => Promise<void>;
  dismissModal: () => void;
}

const AppUpdateContext = createContext<AppUpdateContextType | null>(null);

export const useAppUpdate = () => {
  const context = useContext(AppUpdateContext);
  if (!context) {
    throw new Error("useAppUpdate must be used within an AppUpdateProvider");
  }
  return context;
};

export default function AppUpdateProvider({ children }) {
  const [isChecking, setIsChecking] = useState(false);
  const [isUpdating, setIsUpdating] = useState(false);
  const [isModalOpen, setIsModalOpen] = useState(false);
  const [updateMethod, setUpdateMethod] = useState<"appStore" | "expo" | null>(null);

  const { showAlert } = useAlert();

  const checkForUpdates = async (alertFeedback: boolean = true) => {
    setIsChecking(true);

    if (__DEV__) {
      setTimeout(() => {
        showAlert("info", "No updates available", "You are using the latest version.");
        setIsChecking(false);
      }, 1000);
      return;
    }

    try {
      const { isAvailable } = await Updates.checkForUpdateAsync();
      if (isAvailable) {
        setIsModalOpen(true);
        setUpdateMethod("expo");
      } else {
        if (alertFeedback) {
          showAlert("info", "No updates available", "You are using the latest version.");
        }
      }
    } catch (error) {
      console.log(`Error checking for update: ${error}`);
    } finally {
      setIsChecking(false);
    }
  };

  const handleExpoUpgrade = async () => {
    setIsUpdating(true);
    try {
      const { isAvailable } = await Updates.checkForUpdateAsync();
      if (isAvailable) {
        await Updates.fetchUpdateAsync();

        // Close modal before reload
        setIsModalOpen(false);
        setIsUpdating(false);

        // Small delay for UI updates
        await new Promise((resolve) => setTimeout(resolve, 300));
        await Updates.reloadAsync();
      }
    } catch (error) {
      console.log(`Error fetching update: ${error}`);
      setIsUpdating(false);
      setIsModalOpen(false);
    }
  };

  // Periodic update checks (production only)
  useEffect(() => {
    if (__DEV__) return;

    const interval = setInterval(() => checkForUpdates(false), UPDATE_CHECK_INTERVAL);
    return () => clearInterval(interval);
  }, []);

  return (
    <AppUpdateContext.Provider value={{
      checkForUpdates,
      isChecking,
      isUpdating,
      isModalOpen,
      updateMethod,
      handleExpoUpgrade,
      dismissModal: () => setIsModalOpen(false),
    }}>
      {children}
      <UpdateAvailableModal />
    </AppUpdateContext.Provider>
  );
}
Key Features:
- Development mode detection: Skips update checks in
__DEV__mode - Periodic checks: Automatically checks for updates every 5 minutes
- Graceful error handling: Failures don't crash the app
- State management: Tracks checking, updating, and modal states separately
The Update Modal
The modal shows users that an update is available and gives them two options:
const UpdateAvailableModal = () => {
  const { isModalOpen, isUpdating, handleExpoUpgrade, dismissModal } = useAppUpdate();

  return (
    <BottomSheet isOpen={isModalOpen} onOpenChange={(open) => !open && dismissModal()}>
      <BottomSheet.Portal>
        <BottomSheet.Overlay />
        <BottomSheet.Content>
          <View className="items-center mb-5">
            <View className="size-20 items-center justify-center rounded-full bg-green-500/10">
              <Ionicons name="cloud-download-outline" size={40} />
            </View>
          </View>

          <View className="mb-8 gap-2 items-center">
            <BottomSheet.Title className="text-center">Update Available</BottomSheet.Title>
            <BottomSheet.Description className="text-center">
              A new version is ready to install
            </BottomSheet.Description>
          </View>

          <View className="gap-3">
            <LoadingButton
              label="Update Now"
              onPress={handleExpoUpgrade}
              isLoading={isUpdating}
              isDisabled={isUpdating}
            />
            <Button variant="tertiary" onPress={dismissModal}>
              Later
            </Button>
          </View>
        </BottomSheet.Content>
      </BottomSheet.Portal>
    </BottomSheet>
  );
};
Part 5: The Linking Hook
This hook handles what happens when users tap the push notification. It triggers the update check when the notification's actionType is "update".
import { router } from "expo-router";
import * as WebBrowser from "expo-web-browser";
import { useEffect } from "react";
import * as Notifications from "expo-notifications";
import { useAppUpdate } from "@/providers/AppUpdateProvider";

export default function useLinking() {
  const { checkForUpdates } = useAppUpdate();

  useEffect(() => {
    const handleNotificationAction = (notification: Notifications.Notification) => {
      const { url, actionType } = notification.request.content.data;

      if (!url || typeof url !== "string") return;

      switch (actionType) {
        case "update":
          checkForUpdates(true);
          break;

        case "view":
          const path = url.startsWith("http")
            ? new URL(url).pathname
            : url;
          router.push(path);
          break;

        case "link":
          WebBrowser.openBrowserAsync(url);
          break;

        default:
          break;
      }
    };

    // Check if app was opened from notification
    const lastResponse = Notifications.getLastNotificationResponse();
    if (lastResponse?.notification) {
      handleNotificationAction(lastResponse.notification);
    }

    // Listen for notifications while app is running
    const subscription = Notifications.addNotificationResponseReceivedListener((response) => {
      handleNotificationAction(response.notification);
    });

    return () => subscription.remove();
  }, [checkForUpdates]);
}
Key Features:
- Multiple action types: Supports
update,view, andlinkactions - Cold start handling: Checks for notification that opened the app
- Hot notifications: Listens for notification taps while app is running
The Complete Flow
Here's what happens when you push code to main:
- EAS Update workflow triggers - Detects changes in the
native/directory - Dependencies installed - Bun installs all required packages
- EAS update publishes - New JavaScript bundle is uploaded to Expo servers
- Notification workflow triggered - If update succeeds, triggers the notify workflow
- API route called - Notification workflow hits your backend endpoint
- Push notifications sent - All users receive a notification about the update
- User taps notification - Opens the app and triggers
checkForUpdates() - Update modal appears - Shows "Update Available" with install button
- User taps "Update Now" - App downloads and installs the update
- App reloads - User is now on the latest version
All of this happens without App Store review and without the user leaving the app.
Visual Flow
Push to main
    ↓
[EAS Update Workflow]
    ↓
Install dependencies
    ↓
Publish EAS update
    ↓
Trigger notification workflow
    ↓
[Notify App Update Workflow]
    ↓
Call API endpoint
    ↓
Send push notifications
    ↓
User receives notification
    ↓
User taps notification
    ↓
App checks for update
    ↓
Update modal appears
    ↓
User taps "Update Now"
    ↓
App downloads & installs
    ↓
App reloads with new version
Setting Up the System
Now that you've completed the prerequisites, let's implement the system step by step.
Step 1: Create the GitHub Workflows
Create two workflow files in .github/workflows/:
eas-update.yml- Main workflow that publishes updatesnotify-app-update.yml- Notification workflow that alerts users
Copy the workflow code from Parts 1 and 2 above, making sure to update:
- Your
working-directory(if not usingnative/) - Your
EXPO_PUBLIC_*environment variables - Your
API_URLfor the notification endpoint
Step 2: Create the API Route
In your backend, create an API endpoint at /api/notify-app-update (or your preferred path).
This endpoint should:
- Verify the
x-github-actions-secretheader - Parse the notification payload
- Send push notifications to all users
See Part 3 for the complete implementation.
Step 3: Implement Push Notifications
You'll need a function like sendPushNotificationToAllUsers() that sends Expo push notifications. Here's a basic example:
import { Expo } from 'expo-server-sdk';

const expo = new Expo();

export async function sendPushNotificationToAllUsers(payload: {
  title: string;
  body: string;
  data: any;
}) {
  // Get all user push tokens from your database
  const tokens = await getUserPushTokens();

  const messages = tokens.map(token => ({
    to: token,
    title: payload.title,
    body: payload.body,
    data: payload.data,
  }));

  const chunks = expo.chunkPushNotifications(messages);

  for (const chunk of chunks) {
    await expo.sendPushNotificationsAsync(chunk);
  }
}
Step 4: Implement AppUpdateProvider
Add the AppUpdateProvider component from Part 4 to your app. This handles:
- Checking for updates periodically
- Showing the update modal
- Downloading and installing updates
- Reloading the app
Step 5: Add the Linking Hook
Implement the useLinking() hook from Part 5. This handles notification taps and triggers the update check.
Step 6: Wire Everything Together
- Wrap your app in
<AppUpdateProvider> - Call
useLinking()in your root layout - Build your first production build:
eas build --platform ios --profile production - Submit to App Store and get approved
- Push code to
mainto trigger your first automated update - Watch the magic happen!
Testing the System
Before going live, test each component:
- Test the workflows: Push to
mainand verify both workflows run successfully - Test the API: Manually trigger the notification workflow from GitHub UI
- Test notifications: Verify users receive push notifications
- Test the update flow: Tap the notification and verify the modal appears
- Test the update: Tap "Update Now" and verify the app reloads with the new version
Lessons Learned
1. Separate Workflows Are Better
Initially, I had everything in one workflow. Splitting into two workflows provides:
- Better error isolation: Update succeeds even if notifications fail
- Easier debugging: Clear logs for each step
- Manual control: Can trigger notifications independently
- Flexibility: Easy to modify notification logic without touching deployment
2. Don't Block the Main Thread
When downloading and installing updates, the UI can freeze if you're not careful. Always:
- Show loading states
- Close modals before reloading
- Add small delays between state changes and reloads
3. Handle Development Mode
In development, Updates.checkForUpdateAsync() will throw errors. Always check for __DEV__ and skip update logic.
4. Graceful Degradation
If push notifications fail, the update is still published. Users will get the update the next time they open the app (thanks to the periodic check).
5. Test on Real Devices
EAS updates work differently on real devices vs. simulators. Always test on a physical device with a production build.
6. Secure Your Endpoints
Always use secrets to verify requests from GitHub Actions. Never expose your notification endpoint without authentication.
Troubleshooting Common Issues
Issue: "EXPO_TOKEN is missing"
Solution: Make sure you've added EXPO_TOKEN to your GitHub repository secrets.
# Get your token
eas login
eas whoami --json
Copy the token and add it to Settings → Secrets and variables → Actions in GitHub.
Issue: "Update publishes but users don't get notified"
Possible causes:
- Wrong secret: Verify
APP_ACTIONS_SECRETmatches in both GitHub and your backend - Wrong API URL: Check the URL in
notify-app-update.ymlmatches your backend - Users have notifications disabled: Users must grant notification permissions
- No push tokens stored: Ensure users' push tokens are saved in your database
Issue: "Modal doesn't appear when notification is tapped"
Solution: Make sure:
useLinking()is called in your root layout- The notification data includes
actionType: "update" AppUpdateProviderwraps your entire app- You're testing on a production build (not development)
Issue: "App crashes when checking for updates"
Solution: This usually happens in development mode. Make sure you have:
if (__DEV__) {
  // Skip update check in development
  return;
}
Issue: "Workflow fails with 'Not authorized'"
Solution: Check that:
- Your
EXPO_TOKENis valid (tokens can expire) - You're logged into the correct Expo account
- The project exists in your Expo account
Issue: Using npm or yarn instead of Bun?
Solution: Replace the Bun steps with Node setup:
- name: Setup Node
  uses: actions/setup-node@v4
  with:
    node-version: '20'
    cache: 'npm'

- name: Install dependencies
  working-directory: native
  run: npm ci
Or for yarn:
- name: Setup Node
  uses: actions/setup-node@v4
  with:
    node-version: '20'
    cache: 'yarn'

- name: Install dependencies
  working-directory: native
  run: yarn install --frozen-lockfile
The Results
Since implementing this system, I've been able to:
- Deploy bug fixes in minutes instead of days
- Update 100% of active users within hours
- Eliminate App Store review delays for JavaScript-only changes
- Improve user experience with seamless updates
The entire system is automated. I push code to main, and users get notified automatically. No manual steps. No coordination. Just smooth, automatic updates.
When to Use This Approach
This system is perfect for:
- Bug fixes that need to go out immediately
- UI tweaks and style changes
- Content updates and feature flags
- Small feature additions that don't require native code changes
Important: EAS updates only work for JavaScript and asset changes. If you modify native code (iOS/Android), you'll still need to submit a new build to the App Store.
Conclusion
Building a complete CI/CD pipeline for Expo apps transformed how I ship updates. What used to take days now takes minutes. What used to require user action now happens automatically.
The combination of EAS Updates, GitHub Actions, push notifications, and a smart React Context creates a seamless update experience that feels native and professional.
If you're building an Expo app and haven't set up automated updates yet, I highly recommend it. Your users will appreciate always having the latest version, and you'll sleep better knowing you can fix bugs instantly.
Have questions about setting this up for your Expo app? Want to discuss CI/CD strategies for React Native? Reach out—I love talking about developer tooling and automation.